
-
15 March 2022
- Airflow
Have you got a dilemma because you don’t know which Executor to choose for your next Airflow project? The Celery Executor and the Kubernetes Executor make quite a combination – the Celery Kubernetes Executor provides users with the benefits of both solutions. Would you like to learn how to configure it? Read our article to find out.
The Airflow Kubernetes Executor vs The Celery Executor – a first look
Airflow has two executors in its resources which enable the parallel operation of many tasks. The first is the Celery Executor, which allows you to distribute tasks over many workers. The number of workers and their resources can be defined in advance. These tasks can be performed in parallel on each worker, and the maximum number of tasks that one worker can perform is defined by the worker_concurency variable. The limitation is that the number of workers and their resources must be defined in advance, and they are running all the time. This means that even if no task is being performed, resource costs are charged constantly. In order for the Celery Executor to work properly, it is necessary to implement a message broker (RabbitMQ / Redis), which makes the configuration complicated.
Another Executor supporting the work with a large number of tasks is the Kubernetes Executor, which runs each instance of the task in its own Kubernetes pod. The advantage of this is that each task has its own dedicated resource space to use. A mistake in one task does not affect the other tasks. When configuring the Airflow Kubernetes Executor, it is necessary to use the ‘template’, which is used to create new pods for subsequent tapes.
Read also: How to improve Airflow 2.0 performance with Smart Sensors
Both of these solutions have their advantages and disadvantages, but in larger projects the problem may be to choose a proper solution. This is where the latest solution in Airflow 2.0 – the Celery Kubernetes Executor – comes to the rescue. In this exercise, we used parts of our latest product based on Airflow 2.0 service which is being actively developed by DS Stream (therefore we cannot provide the full code to recreate the job). If you are interested in details, please contact sales. Soon, more details about this project will also be available on our website.
Celery Kubernetes Executor
This is a combination of the two solutions mentioned above. It allows you to use both the Celery and the Kubernetes Executors at the same time. This combination gives more possibilities but also requires more work as it is necessary to configure both executors. This combination is primarily ideal for processes where there are many undemanding tasks that can be performed with Celery, but also contain resource-intensive tasks or runtime isolation.

Configuring the Celery Kubernetes Executor
To configure the Airflow setup to use the Celery Kubernetes Executor, you need:
- External database
- Message broker (RabbitMQ/Redis)
- pod-template.yaml – pod template needed for Kubernetes Executor to create new pods
In the config file airflow.cfg it is important to set executor=CeleryKubernetesExecutor and kubernetes_queue = kubernetes. In this case, Celery Executor becomes the default executor. The desire to change the executor to Kubernetes Executor should be expressed in a DAG file in operator variables and added to the variable queue=’kubernetes’:

We will run our system on the Kubernetes Service in Microsoft Azure. To do this, configure the Docker Image that will be used in the Airflow setup. When creating it, I am using the Apache Airflow image in version 2.1.4 available at https://hub.docker.com. Dockerfile code below:
# Dockerfile code
# Latest LTS version
FROM apache/airflow:2.1.4

ENV AIRFLOW_HOME /opt/airflow
RUN pip install --upgrade pip
COPY --chown=airflow:root ./app/ ${AIRFLOW_HOME}
COPY --chown=airflow:root ./deployments/pod-template.yaml ${AIRFLOW_HOME}/pod-template.yaml
It is important to create the pod-template.yaml file that the Kubernetes Executor will use when creating new pods. There you can define what resources are required for each pod and their limits. Remember to upload this file to the image that will be used in the Airflow configuration to the path ${AIRFLOW_HOME}/. The path to this file needs to be saved into a pod_template_file in the file airflow.cfg (pod_template_file = /opt/airflow/pod-template.yaml).
#pod-template.yaml
apiVersion: v1
kind: Pod
metadata:
  name: airflow-task
  labels:
    app.kubernetes.io/name: airflow
spec:
  containers:
    - args: []
      command: []
      env:
      - name: AIRFLOW__CORE__SQL_ALCHEMY_CONN
        valueFrom:
          secretKeyRef:
            name: secrets
            key: airflow-backend-db-conn-string
      - name: AIRFLOW__CORE__FERNET_KEY
        valueFrom:
          secretKeyRef:
            name: secrets
            key: airflow-fernet-key
      image: dummy-image
      imagePullPolicy: IfNotPresent
      volumeMounts:
        - mountPath: "/opt/airflow/logs"
          name: airflow-logs
      resources:
        requests:
          memory: 256Mi
          cpu:  0.05
        limits:
          memory:  256Mi
          cpu:  0.1
      name: base
  securityContext:
    runAsUser: 50000
    fsGroup: 50000
  hostNetwork: false
  restartPolicy: Never
  nodeSelector:
    "agentpool": nodepool1
  volumes:
    - name: airflow-logs
      persistentVolumeClaim:
        claimName: airflow-logs-pvc
The configuration of Celery with the message broker is identical to that of Celery Executor. We described this action in another article.
Testing
Configured this way, the Airflow setup allows you to use both Executors depending on the needs of the project. To test this, I configured the Airflow setup as described above and checked if it really can be used by both Executors. Two DAGs were created :
- test_10_task_celery – Celery Executor (10 parallel tasks)
- test_10_task_kubernetes – for testing the Airflow Kubernetes Executor (10 parallel tasks).
The only difference between them is the parameter queue=”kubernetes” in test_10_task_kubernetes.


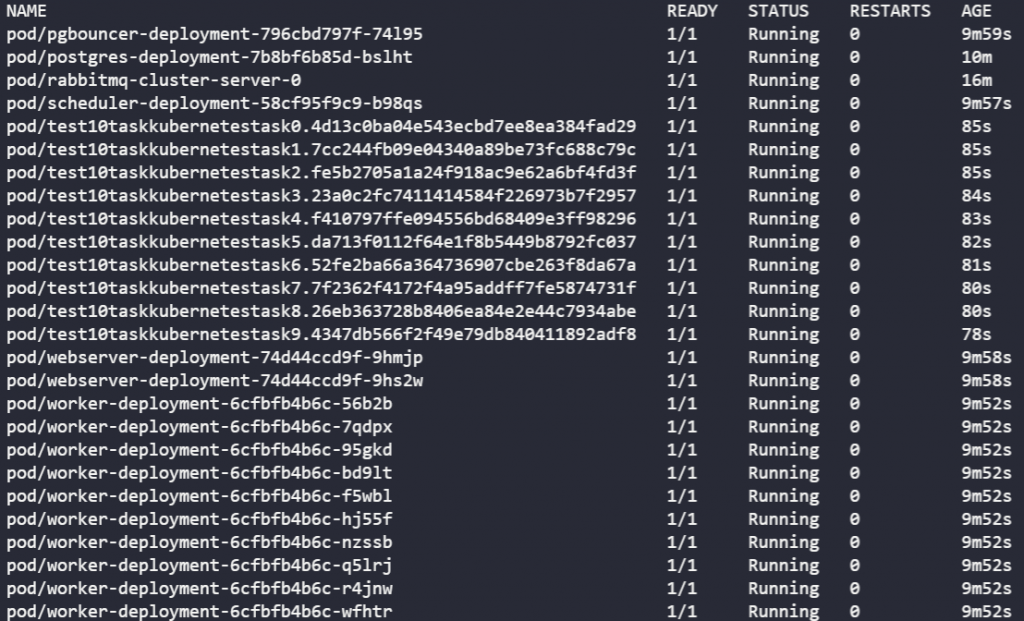
There are 10 workers (worker-deployment-%) for the Celery Executor and 10 new temporary workers (test10taskkubernetestask#.%) for the Kubernetes Executor:
When the test_10_task_kubernetes is done, temporary workers are deleted, but Celery workers are still alive:


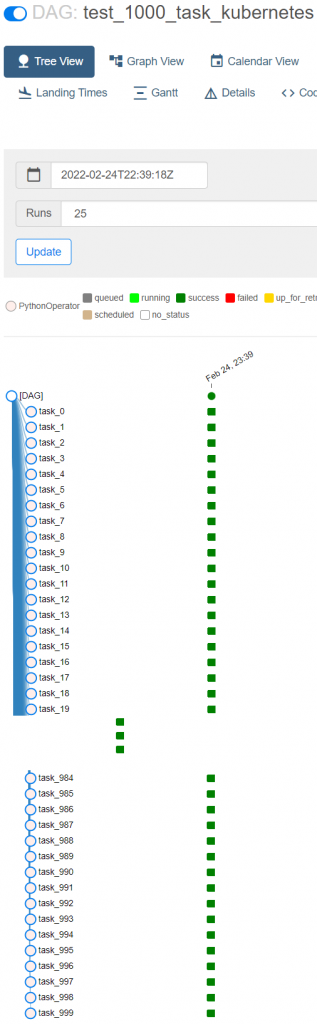
The Celery Kubernetes Executor, configured in this way, also allows you to run 1000 parallel tasks, both with the help of the Celery Executor (solution here) and with the help of the Kubernetes Executor. For this purpose, the parameters have been set as follows:
- scheduler_heartbeat_sec = 1
- worker_pods_creation_batch_size = 16
- worker_pods_pending_timeout = 600
- worker_pods_queued_check_interval = 10

The advantage of using the Airflow Kubernetes Executor is that the resources are not being used all the time. Celery consumes some resources constantly, with workers running around the clock, while Kubernetes only takes resources when it needs to perform tasks. The question that arises now is – which of these solutions is more financially beneficial? We did a little comparison using the Azure Pricing calculator. In our comparison, we assumed that the Kubernetes Executor would work 1 hour a day (13 nodes); in addition, I would need 2 nodes, which will be responsible for the work of the webserver or scheduler.
Read also: A more efficient scheduler to improve performance in Airflow 2.0
For the Celery Executor, 6 nodes are required for the entire month. The results of this comparison are presented below:


The difference is over $1000 in favor of the Kubernetes Executor! The costs vary widely, but it should be remembered that each case is different and must be analyzed individually. If the resources were needed not for 1 hour, but for 5 hours, the costs of both solutions would be equal.
Conclusion
Both the Celery and the Kubernetes Executors have their own advantages and disadvantages. Neither is perfect for every job. The Celery Executor is an ideal solution for a large number of tasks that do not need a lot of resources. In turn, the Kubernetes Executor allows you to create a separate environment for each of the tasks, which translates into the possibility to make more demanding tasks. In addition, the Kubernetes Executor does not keep unnecessary, unused pods in the absence of tasks, while the Celery Executor has a permanently defined number of working workers – regardless of their consumption. Their combination which is possible with Airflow 2.0– the Celery Kubernetes Executor – allows for even better and more effective work without the compromises necessary when choosing one of the two Executors. How can Airflow help your business? Visit our Data Pipeline Automation page and find a solution suited to your needs. The entire Airflow startup process will be automated by our application, which will allow you to setup the entire infrastructure with one click. During its construction, modern concepts and technologies, such as CI/CD, Terraform or Kubernetes, will be used. For more details – contact sales.
Learn more about Airflow 2.0:
- A more efficient scheduler to improve performance in Airflow 2.0
- Powerful REST API in Airflow 2.0 — what do you need to know?
- How to simplify Airflow 2.0 setup with the DAG Versioning and Serialization