Azure SQL authentication with AD
pting to just create database user and use simple sql authentication – but that’s not always possible, especially when dealing with highly restricted data.
In such cases, we are forced to use AD authentication, and to make things even less friendly we often have to get a technical user for scheduled processing and such.
It’s not overly complicated, but the process might not be very straightforward. Visit our Data Engineering Consultancy to find solutions suited for your company
Solution
To set up Azure SQL authentication with Azure Active Directory (AD), the first step is to create an app registration in Azure Active Directory. This app registration will act as a substitute for a “technical user” and will allow us to authenticate securely. Below is a detailed step-by-step guide to help you through the process:
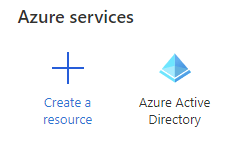
Step 1: Navigate to Azure Active Directory
- Log in to your Azure Portal.
- In the left-hand menu, locate and click on Azure Active Directory under Azure Services. This is where you will manage all aspects of your directory, including app registrations.
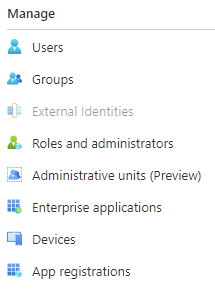
Step 2: Access App Registrations
- Once inside Azure Active Directory, look for the App Registrations option in the left-hand menu.
- Click on App Registrations to view the list of existing app registrations or to create a new one.
Step 3: Create a New App Registration
- In the App Registrations section, click on the New Registration button located at the top of the screen.
- Fill in the required details:
- Name: Enter a meaningful name for your app (e.g., "SQLAuthApp").
- Supported Account Types: Select Single Tenant if the app will only be used within your organization.
- Redirect URI: This is optional for now and can be left blank unless you have a specific URI in mind.
- Once all the details are filled in, click the Register button to create the app registration.
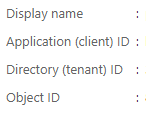
Step 4: Retrieve App Properties
After the app registration is created, you will need to gather some key properties for further setup:
- Application (client) ID: This is the unique identifier for your app.
- Directory (tenant) ID: This is the identifier for your Azure AD tenant.
- Client Secret: You will create this in the next step.
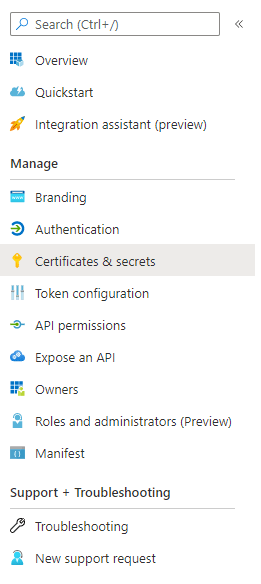
Step 5: Create a Client Secret
- Navigate to the Certificates & Secrets section within your app registration.
- Click on New Client Secret to generate a secret key for your app.
- Provide a description for the secret (e.g., "SQLAuthSecret") and set an expiration period (e.g., 6 months, 1 year, or custom).
- Click Add to generate the secret.
- Copy the generated secret value and store it in a secure location, such as Azure Key Vault, as it will not be displayed again.
Step 6: Assign Permissions
- Go to the API Permissions section of your app registration.
- Click on Add a Permission and select Azure SQL Database from the list of APIs.
- Choose the appropriate permissions (e.g., user_impersonation) and grant admin consent if required.
Step 7: Configure Azure SQL
- Navigate to your Azure SQL instance in the Azure Portal.
- Add the app registration as an external user in your SQL server.
- Assign the necessary roles and permissions to the app, such as db_datareader or db_datawriter, depending on your requirements.
By completing these steps, you will have successfully created an app registration in Azure Active Directory, which can now be used as a technical user for secure authentication with Azure SQL. This setup ensures that your database is protected while allowing seamless integration with your applications.
Than choose App Registrations in left hand menu:
Click New Registration in upper part of the screen:

Fill in the name of the app, check Single Tenant, and finally click “Register” button.
When app is created we will need some of its properties for further setup:
We will also need a secret that will be used to authenticate our app. To create new secret, let’s go into our app, and choose “Certificates & Secrets”:
Next, click “New client secret” and after it is created, store it in safe place, key vault potentially.

Once we obtain above info, we may start setting up connection to our Azure SQL instance.
At this point we have several ways to do that. We might try to use our app, give it permissions for Azure SQL instances, create external user on SQL server, but this is often impossible due to administrative restrictions in Azure environment.
Let’s try more universal way, that is almost as simple as latter – generate access token, and use it for logging in.
To generate token we will use MSAL library for python (ADAL is soon to be left out).
We need to invoke instance of ConfidentialClientApplication object from msal library.
Class constructor needs some parameters:
client_id – this is our Service Principal ID (Application ID)
This block contains unexpected or invalid content.ResolveConvert to HTMLauthority – this is a URI consisting of a api link: https://login.microsoftonline.com/ and Tenant Id (Directory Id of our app)
client_credential – earlier created app client secret
Having all info gathered, we instantiate the app:
app = msal.ConfidentialClientApplication( client_id=ServicePrincipalId, authority=authority, client_credential=ServicePrincipalPwd,)
And use it’s acquire_token_silent method:
result = app.acquire_token_silent(scopes=[scope], account=None)
This block contains unexpected or invalid content.ResolveConvert to HTMLwhere scope is: https://database.windows.net//.default (with double “//” – not a mistake)
Silent method might not work, in such case go for another one:
if not result: result = app.acquire_token_for_client(scope)
Than check if we received token in response, and save it:
if "access_token" in result: sqlAzureAccessToken = result["access_token"]
We are almost ready to connect with JDBC. Just make a URI:
jdbcUrl = "jdbc:sqlserver://ourserver.database.windows.net:1433;database=ourdatabase;encrypt=true;trustServerCertificate=false;hostNameInCertificate=*.database.windows.net;loginTimeout=30;authentication=ActiveDirectoryPassword"
and connection properties:
connectionProperties = { "accessToken" : sqlAzureAccessToken, "driver" : "com.microsoft.sqlserver.jdbc.SQLServerDriver", "hostNameInCertificate" : "*.database.windows.net", "encrypt" : "true", "ServerCertificate" : "false", "driver" : "com.microsoft.sqlserver.jdbc.SQLServerDriver"}
And we’re good to go:
jdbc_db = spark.read .format("com.microsoft.sqlserver.jdbc.spark") \ .option("url", "jdbc:sqlserver://ourserver.database.windows.net") \ .option("dbtable", "(SELECT * FROM mytablespace.mytable) a") \ .option("databaseName","ourdatabase")\ .option("accessToken", sqlAzureAccessToken) \ .option("encrypt", "true") \ .option("hostNameInCertificate", "*.database.windows.net") \ .load()
The advantage of cloud over traditional it solutions for businesses
Cloudstack vs openstack-what they are and can they be compared at all